Monday, September 14, 2015

DIY Metal Chair Makeover

Hello cyber-world!

It's been far too long since my last visit.  *Shoutout to Chanel and Chara* I appreciate my sisters for doing their best to breathe life back into this blog, and I am going to try to do the same.

All I'll say is that it has been a crazy time in my life.  Our family has moved from Nevada to Indiana, and we're still settling in...I have almost nothing hung on the walls of my house, and each room has it's own stack (or two) of boxes left to unpack.  I have always been a West Coast girl, so adjusting to the weather & humidity here is still a little difficult for me.  But, despite all the challenges that this move has caused, I believe it has been, and will be, a good thing for our family.  One of the few constants in life is change.  All we can do is buckle up, say a prayer, and enjoy the ride!

I did this DIY a little while ago, but I just never made post about it.  So here goes!

Have you ever bought something because 1) it was really cheap, and 2) you could see potential for something awesome with a small, easy makeover, but then it just sat in your house looking sad and unfinished for years?  That's what had happened to me.


I bought these chairs off of a friend that was selling them for really cheap.  My vision for them over the years has changed slightly (as I have found that my decorating style has evolved over the past few years), but I finally found some fabric at Wal-Mart on clearance that I was ABSOLUTELY in love with!  So I brought it home, and decided the time had come to tear the chairs apart!


Luckily, the paint on my chairs wasn't peeling off like crazy.  I did not feel the need to sand it or remove the previous paint in any way (mostly because I'm lazy, but also because I was so excited to get started that I was ready to just jump right in).  I broke it down, bought some spray paint, and went straight to work!


While I patiently impatiently waited for each coat to dry, I would work on the cushions.

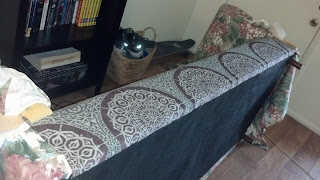
 This is the old fabric (on the left) next to the new fabric (on the right).
 
This is how I tackled this part of the project:
 
Step 1: Lay my old cushion (with the old fabric still on, because I'm not cool like my sister) on the new fabric, and cut out a rough square.  Pull the sides up and over to make sure it covers everything before you cut.


Step 2: Pull gently on the sides and start stapling them down on the backside.  You don't want to pull it too tight, or you'll have weird dips in your cushion on the other side.  So pull gently, but try to get it snug.


Step 3: The corners...some people have a specific strategy when it comes to their corners.  I just folded a little, and stapled it in place, and folded some more, and stapled in place. In the end, my corners looked just fine!


Step 4: Reduce some of the bulk around the corners.  All you have to do is take a pair of scissors and cut those little flags hanging off of each corner until it looks nice to you.


TA DA!


Step 5: This is the really fun part!  Once you have followed all the directions on your package of spray paint/clear coat (or...gotten so fed up with it that you settle for no clear coat because you just can't wait to finish...) you can put it all together!


Voila!  I was so happy with how these turned out.  I've got the bug now!  I want to recover every piece of furniture in my house!

Just too cute to pass up!
And don't they just look great with my newly acquired piece of furniture? (Thanks to my mother-in-law!  How did she know I would love it so much? <3)


I hope everyone has a happy Monday!

If you see a project, recipe, kids activity, or life hack that you'd like us to try, let us know!

Thursday, September 3, 2015

DIY Chair Reupholstery


Well I think I have now caught the DIY bug.  Ever since I recovered our sofa, I want more projects to do!  My sister-in-law gave me this one; an old upholstered dining room chair that she uses at her desk now.  I don't know about you, but that dusty rose fabric just wasn't quite her cup of tea...or mine either for that matter!

Part I:  The Deconstruction

This one was pretty easy to start off, just ripping all that nasty pink fabric off with my trusty screwdriver and pliers.  I saved all the fabric from the back to use as pattern pieces, and the batting was also saved for re-use.

When I started ripping the fabric off the seat cushion, I discovered that this was apparently not the first time this chair has been reupholstered!  It had another layer of red-orange velvet underneath, even uglier than the pink!  Shocking, I know.


So that was promptly stripped off as well (don't worry, no more layers of fabric under that!), down to the seat cushion.

Part II:  The Reconstruction

I used those pieces of gross old fabric as my pattern pieces, leaving about an extra 1/2" all the way around so I'd be able to fold the fabric under and get clean edges on the chair.

I started with the back of the chair.  I stapled down the first back piece since that was going be covered up by another layer anyway, and you can't see the staples from the back.  Then I attached the batting and top layer of fabric, folding the edges under as I went and gluing them down with Tacky Glue.  Anyone who knows me knows that I use Tacky Glue for pretty much everything!  If you've never used it, try it now!!   It is so worth your investment!

Anyway, as I went along pulling the fabric tight and gluing it down, I started adding these decorative upholstery tacks that we got at Home Depot (for the entire chair I used about 1 1/2 boxes of the tacks).  You could do the tacks as a solid border all the way around instead of spacing them out, but you'd need 3 or 4 times as many.


The tacks were easy enough to hammer in, but I did have some that bent and ended up in the trash.  This was another reason why I glued the fabric instead of stapling it; I didn't want any exposed staples under the tacks.  The hardest part of this was probably going around the corners and still getting my folded edges to be clean.  But thank goodness for that glue!

When I did the seat, I started by pulling my fabric tight over the seat and stapling it in a couple places so it would stay tight.  The I just removed the staples as I went along gluing and adding the tacks.


And there it is!  All done!  Pretty simple and straightforward.  Comment below if you have any questions or comments and thanks for reading, everyone!!

Friday, July 31, 2015

DIY Sofa Reupholstery and the Revival of the Blog


This blog...this poor, poor blog.  So sad, lost and forgotten!  It's been FOUR MONTHS since the last post!  However I do take comfort in knowing I made that post, meaning I'm slightly less of a slacker than my two lovely sisters...right? :) Just kidding ladies.

But really, we have all been so bad about this.  I think my biggest issue is that I have felt like the most boring person ever and that I didn't have anything interesting to share...until now!

So we have this sofa...this incredibly ugly yet very comfortable freebie sofa that was given to us by some family friends.  I cannot begin to describe how much I disliked this sofa, or really just the upholstery.  That 80's green and pink floral just wasn't my cup of tea at all.  Right after we got married we tried a slipcover on it and that did not turn out well.  Because the back cushions are more pillow-like it just looked lumpy and the slipcover wouldn't stay put.  That solution only lasted about a day.  So it went back to being that hideous floral print.


After that first slipcover debacle I decided I wanted to cover just the cushions and pillows, and then slipcover the rest so it would look at least halfway decent without being lumpy.  Jared, however, wanted me to redo the ENTIRE thing because of his hatred of slipcovers in any form.  We went back and forth about this for a while.  Was he crazy?  I couldn't try to take on an entire sofa for my first reupholstering project...or could I?

Finally, a couple weeks ago I decided I was just going to do it.  I read tons of tutorials from Pinterest and did my best to prepare...and so it began!


PART I: The Cushions

Originally I thought the cushions would be the easiest part of this project.  I had made pillow covers before, so how hard could it be?  Boy was I wrong.

The back cushion/pillows were simple enough, and they only took me about an evening and a half between cutting all the pieces and sewing them together.

Then we get to the pain-in-the-rear seat cushions.  They don't even have any piping on them, again leading me to believe that they'd be easy.  But the way that they were constructed ended up being a lot more complicated than I thought.  Since the cushions will vary from sofa to sofa, I'll just give you my tips for making the whole process easier instead of a step-by-step.

Tip #1: Use what you have! I started by ripping one of the existing cushion covers apart with a seam ripper to reference as pattern pieces.  I also re-used the existing zippers because I was having a hard time finding zippers that would be long enough.

Tip #2: Get the right needles and thread! Part of what made these take so long was that I didn't have the right kind of sewing machine needles for this fabric.  They were #80 universal needles, and my fabric was a fairly thick woven.  I broke about 5 needles before I gave up and got more heavy duty (#100, Denim) needles the next day.  **Make sure you have the correct needles for the type of fabric you have!  When in doubt, the people at the fabric/craft store will usually be able to help.**  You will save a lot of time and frustration, not to mention a lot of broken needles.

Tip #3: Pinterest it up!  Especially if you're a beginner at this, find as many tutorials as you can on Pinterest, YouTube, etc.  I've done a good handful of sewing projects so I wasn't a total beginner, but I had never had to sew a zipper before...I always made my mom do it. :)  So I found this blog that teaches you how to sew zippers!  So handy!


PART II: The Frame

Supplies you may need:
- Flathead screwdrivers for removing staples (I had a few different sizes on hand)
- Pliers of some sort for removing really stubborn staples
- Thick gloves (these will come in handy when you're taking the staples out of the fabric)
- A vessel for collecting staples as you go

This part seems so daunting, but in reality it's much easier than it seems.  I started by ripping that sucker apart piece by piece.  I completely discarded the skirt and piping from around the bottom since I was way too lazy to attempt redoing that.  I pulled the back piece off on the top and sides, but left it attached along the bottom.  I wanted to have the existing batting and fabric to use as a reference for my new piece.


I did something similar on the end pieces, leaving most of it attached along the bottom and partway up the sides.  Before you start attaching new fabric, it's a good idea to vacuum out the inside of the sofa.


These arm caps were easy to remove since they were simply nailed in.  I also removed the piping from around the edges of these (again...way too lazy and I didn't think it was necessary).


Once you've got it taken apart it's easier to see how the whole thing is put together and which pieces need to go on first.  I started with the inside back piece and the front along the bottom.  Since I had a fabric with a large pattern, I made sure it was mostly centered on the sofa.  Then just pull, tuck, and staple away!  I used my cheapo $10 staple gun and it didn't do too bad.  Because I'm still lazy, I didn't bother removing the existing fabric.  I just removed the staples that attached it to the inside frame so I could pull the new fabric through.


Next came the tops/insides of the arms.  That was one of the easiest parts, surprisingly.  Just fold and staple so it fits the curve!


For the sides of the arms, I started by stapling along the top, with my new piece of fabric flipped over so I could staple underneath it and the staples wouldn't show.  Hopefully this makes sense with the photos.


The last big piece was the back.  Originally the sides of the back piece were attached using metal tack strips, which I took out and discarded since I wasn't sure how well they would work to reuse.  I stapled the top of this piece using the same tactic I used to do the end pieces so I wouldn't have staples showing along the top.


I ended up just stapling outside of the fabric on the vertical edges of the back.  I originally didn't want to have staples showing, but since the fabric pattern is mostly grey they don't really show too bad here.  No harm done.  I did end up having to get some longer staples for this part because there were so many layers of fabric to go through at this point.

The arms caps were very last.  Just staple the new fabric over the old!  I didn't bother taking them all apart.  The nails stayed where they were and it was pretty easy to just hammer them back in place through the fabric.

Ta da!!!  This whole process only took about a day.  The only part I didn't finish that day was stapling all the edges onto the bottom of the sofa.


PART III: The Reveal

Drumroll please.....


Voila!  I am so happy with how this turned out!  I thought I couldn't do it, but the parts I thought would be hard turned out to be the easiest, and vice versa.  Of course I never would have done it if my dear sweet husband hadn't believed I could (he's pretty proud of himself for being right). :)

So there you have it!  Comment below if you want any more details or have any questions!

Tuesday, March 24, 2015

A Year Ago...

Who wants to hear a story?  It's a pretty fun one I think, but I might be just a little bit biased.  It's the story of my first date with this one really cute guy who ended up being my husband.  So it's a story that I'm particularly fond of! :)

It was a Sunday morning, and my roommates and I were at church, talking to our home teachers and their roommates (whom we had met, but didn't know all that well).  One of them was a particularly good-looking guy and just happened to be wearing a tie that I loved.  After mentioning it to him a few times because I loved it so much, he proceeded to sit next to me in Sunday school and we chatted a bit more.  We talked about the potluck we'd both be going to later at a mutual friend's place and he said he'd like to bring cookies but he didn't have any of the stuff to make them.  That cheeky sneaky little devil.  I played right into it and said, "Well I have ingredients, you could come over and make some!"  I didn't think he'd actually do it, but after church he said, "Okay, cookies tonight right?"  Pleasantly surprised, I said yes and we did indeed make cookies for the potluck that night.

This is from when we first started
dating...we're still this weird.
Now a little background, I have to let you know that I LOVE dancing.  People who knew me when I was younger may not believe it, but I started going Latin dancing on Friday nights my sophomore year of college and absolutely fell in love with it!  I would usually go with my best friend Tori, but the after she got married (who does that??) I would either go by myself or try and convince my friends and roommates (or anyone, really) to go with me.  It was the highlight of my week to be able to take a break from work and school and just go have fun.  So needless to say, at the potluck that Sunday evening Jared and I had been talking the entire time and I mentioned that he should come dancing that weekend.  He then slyly asked for my phone number and later that night suggested we make dinner before we went dancing, officially making it a date.

On the evening of our date (one year ago last Friday), he picked me up and took me to his place and we proceeded to make dinner. The process would probably have been fairly uneventful if Jared hadn't found a chicken butt in the bag of chicken thighs he had bought.  Literally, a tail piece of chicken (I don't know what it would technically be called, or if that would even have a technical name).  He thought that was just about the funniest thing and even wiggled it right in my face.  Luckily, I liked him enough that I thought it was funny too, even if he was kind of a dork.  We shared dinner with another of his roommates and his date, and continued on to Latin dancing!  Jared ended up being a fair dancer, compared to so many others I've met who can't keep a beat for the life of them.  He was a very good sport about the whole thing and we even learned a few new steps together.  It was clearly an excellent date and led to many more in the following weeks.


Now, the interesting part about this whole date were the things I found out later; #1 He doesn't even really like dancing, but it was a perfect date opportunity and he knew I liked it so he went.  #2 He doesn't like Corn Flakes, and what did we make for dinner that night?  Corn Flake chicken.  I didn't find this fact out until after we were married, but when I asked him why he didn't tell me that on our first date, he said he didn't care that night, he just wanted to be with me.  He hardly even remembered that that's what we made...sounds like he wasn't too focused on the dinner. :) Man, this guy was a keeper right from the beginning!

And it really is true.  There is no one else I would rather spend forever with than this man, my eternal companion.  It means so much to be with someone who wants to spend just as much time with you as you do with them.  He makes me smile every day and constantly reminds me how much I mean to him.


So, my friends, we are living proof; one great date can change your life...it certainly did mine!


P.S. If you like our engagement/bridal/wedding photos, you should check out more fabulous photography by our brother-in-law, A.J. Jones here. :)