Tuesday, March 24, 2015

A Year Ago...

Who wants to hear a story?  It's a pretty fun one I think, but I might be just a little bit biased.  It's the story of my first date with this one really cute guy who ended up being my husband.  So it's a story that I'm particularly fond of! :)

It was a Sunday morning, and my roommates and I were at church, talking to our home teachers and their roommates (whom we had met, but didn't know all that well).  One of them was a particularly good-looking guy and just happened to be wearing a tie that I loved.  After mentioning it to him a few times because I loved it so much, he proceeded to sit next to me in Sunday school and we chatted a bit more.  We talked about the potluck we'd both be going to later at a mutual friend's place and he said he'd like to bring cookies but he didn't have any of the stuff to make them.  That cheeky sneaky little devil.  I played right into it and said, "Well I have ingredients, you could come over and make some!"  I didn't think he'd actually do it, but after church he said, "Okay, cookies tonight right?"  Pleasantly surprised, I said yes and we did indeed make cookies for the potluck that night.

This is from when we first started
dating...we're still this weird.
Now a little background, I have to let you know that I LOVE dancing.  People who knew me when I was younger may not believe it, but I started going Latin dancing on Friday nights my sophomore year of college and absolutely fell in love with it!  I would usually go with my best friend Tori, but the after she got married (who does that??) I would either go by myself or try and convince my friends and roommates (or anyone, really) to go with me.  It was the highlight of my week to be able to take a break from work and school and just go have fun.  So needless to say, at the potluck that Sunday evening Jared and I had been talking the entire time and I mentioned that he should come dancing that weekend.  He then slyly asked for my phone number and later that night suggested we make dinner before we went dancing, officially making it a date.

On the evening of our date (one year ago last Friday), he picked me up and took me to his place and we proceeded to make dinner. The process would probably have been fairly uneventful if Jared hadn't found a chicken butt in the bag of chicken thighs he had bought.  Literally, a tail piece of chicken (I don't know what it would technically be called, or if that would even have a technical name).  He thought that was just about the funniest thing and even wiggled it right in my face.  Luckily, I liked him enough that I thought it was funny too, even if he was kind of a dork.  We shared dinner with another of his roommates and his date, and continued on to Latin dancing!  Jared ended up being a fair dancer, compared to so many others I've met who can't keep a beat for the life of them.  He was a very good sport about the whole thing and we even learned a few new steps together.  It was clearly an excellent date and led to many more in the following weeks.


Now, the interesting part about this whole date were the things I found out later; #1 He doesn't even really like dancing, but it was a perfect date opportunity and he knew I liked it so he went.  #2 He doesn't like Corn Flakes, and what did we make for dinner that night?  Corn Flake chicken.  I didn't find this fact out until after we were married, but when I asked him why he didn't tell me that on our first date, he said he didn't care that night, he just wanted to be with me.  He hardly even remembered that that's what we made...sounds like he wasn't too focused on the dinner. :) Man, this guy was a keeper right from the beginning!

And it really is true.  There is no one else I would rather spend forever with than this man, my eternal companion.  It means so much to be with someone who wants to spend just as much time with you as you do with them.  He makes me smile every day and constantly reminds me how much I mean to him.


So, my friends, we are living proof; one great date can change your life...it certainly did mine!


P.S. If you like our engagement/bridal/wedding photos, you should check out more fabulous photography by our brother-in-law, A.J. Jones here. :)

Wednesday, March 18, 2015

Chicken Pot Pie for Busy Moms

How many of you remember those frozen chicken pot pies you used to eat once-in-a-blue-moon as a kid?  You know, the ones that were never quite cooked all the way on the bottom, but you didn't care because this was a once-in-a-blue-moon opportunity?  (Or maybe they're still part of your daily diet? #lucky)

As amazing as those were...forget it!  These are WAY better!

Mini Chicken Pot Pies--in Muffin Form
(Or "cupcake" form...they're about that good!)


 I don't know about you, but I have considered the possibility of making a real chicken pot pie in the past, just because I really wanted one.  But, somehow, the prospect scared me out of it.  It just seems so involved.

But then I found the recipe for these, and I figured, THIS, I can handle!

I have tweaked it a little to make it work for me.  So if you want the original recipe, click the link in the paragraph above.

Mini Chicken Pot Pies
  • 2 (10 oz) cans Pillsbury refrigerated biscuits (I actually make my own biscuits.  I will include the recipe below.)
  • 1 chicken breast, poached & diced
  • 1 can cream of chicken soup (10 oz)
  • 1/4-1/3 cup sour cream
  • 1 cup frozen mixed veggies (mine has carrots, peas, green beans, and corn)
  • 1 cup shredded cheddar cheese
  • Onion powder
  • Garlic powder
  • Italian seasoning
  • Thyme
  • Salt & Pepper
Biscuits:
Mix:
  • 2 cups all-purpose flour
  • 4 tsp. baking powder
  • 1/2 tsp. salt
Cut in:
  • 6 Tbsp. cold butter or margarine
Add:
  • 1 cup milk
Stir it together.  Then knead 8-10 times on a lightly floured surface. Pat or roll it out to about 1/2 thickness.  I then use the metal screw band from a canning jar to cut out 12 biscuits.

Now back to the "pies":
  1. First you have to poach the chicken breast (which I had never done before I made this...but it was super easy!).
    1. Place chicken breast in the bottom of a small pot.
    2. Sprinkle salt, pepper, some herbs (I usually use italian seasoning, thyme, rosemary...etc.) and a bay leaf on the chicken.
    3. Cover the chicken breast with water or broth (or a little of both).
    4. Bring to a boil, then quickly turn the heat to low so the water is barely at a simmer.  Partly cover and gently simmer for 10 min.
    5. Turn heat off completely, and leave the chicken in the hot water for 15-20 minutes, until cooked through.  
    6. Shred or dice the chicken.
  2.  In a large bowl combine the cooked chicken, cream of chicken soup, sour cream, frozen veggies, cheese, and spices.

  3. Lightly grease a 12-cup muffin pan.  Press the biscuits into the bottom and sides of each cup.
  4. Evenly spoon the pot pie mixture into each biscuit cup.

  5. Bake for 12-15 minutes, until edges of biscuits are golden brown.
  6. Let sit for 3 minutes, then DIG IN!
You may be thinking, "You crazy, Lauren!  12 little muffins isn't enough to feed my family for dinner."  You'd be surprised...these are VERY filling!  I usually can only eat 2.  MAYBE 3, if I really want to stuff myself.
 
These are so delicious!  You will not regret trying them out!

Seriously.

Go make them.

Now.

Let me know how it goes!

And again, contact us if there is something you'd like to see us write about!  :)

Monday, March 16, 2015

Confessions of a Pinterest Addict: Funfetti Cookies

What can I say...I'm definitely addicted to Pinterest.  It's ridiculous.  I didn't realize it would be like this when my roommates first introduced me to it my freshman year of college, but here I am 80 Pinterest boards later and still going strong (disclaimer: at least half of those boards were for school projects so maybe it's not quite as bad as it seems...maybe).  Seriously though, anytime I want to take mental break at work or even at home, I'm off to Pinterest to peruse.  But nothing makes you feel more self conscious about it than when your husband looks over your shoulder and says, "Holy cow over 8,000 pins?!" and you sheepishly say yes and hope he's not judging too much.  Then the other day he asked if I still get on just to look at and pin things.  Um...of course!  Hence the 8,000 pins.  But then I think "Hey, you know all that delicious food I make?  Yeah most of that came from Pinterest!"  So it must be good for something, right?  I think so!

As ridiculous as I am, though, I have found some beauties via Pinterest!  This recipe for Funfetti Gooey Butter Cookies is one of them.  The best part?  It's one of the EASIEST cookie doughs you'll ever make!  And they are absolutely delicious!  The first time I made them they were gone the next day (yes, an entire batch between the two of us in less than 24 hours).  The second time I think we stretched the batch out to TWO days, with a very clever tactic of putting them in a bag instead of just on a plate on the counter.  You'd be surprised - the effort it takes to open the bag and grab a cookie stops you from eating one every time you walk past.  Unfortunately the first two times I made these cookies I did not take any photos.  Well shucks, guess I'll just have to make them again!  I'm sure the hubby will be real disappointed. ;)

I've modified this recipe just a touch to make it even simpler than it already was, mostly just because I'm lazy.  But the original recipe can be found here: http://cookiesandcups.com/funfetti-gooey-butter-cookies/.  It calls for you to refrigerate the dough for an hour, but honestly the first time I made them I didn't even read that step.  On the second go-round I realized it, but the cookies had turned out fine before so I haven't ever worried about it!

Pardon my wanna-be photography from my phone!


Funfetti Gooey Butter Cookies

8oz. Cream cheese, room temperature
1/2 cup (1 stick) butter, room temperature
1 egg
1 box Funfetti Cake mix
Powdered sugar for rolling

1. Preheat oven to 350.
2. Beat butter and cream cheese until smooth.
3. Add in egg and continue to mix just until incorporated, scraping down sides of bowl as needed.
4. Add in cake mix and beat until fully combined.
5. Form dough into 1" balls and roll in powdered sugar.  Place on cookie sheet about 2" apart (I've done greased and un-greased and either way works, but the bottoms of your cookies will brown a bit more with a greased cookie sheet).
6. Bake for about 10 minutes.

The tops of the cookies will still look pretty pale, but check the bottoms before you decide if they're done or not.  They are soooo soft and light!  And when you make them as small as the recipe calls for they are bite size, making them dangerously convenient.  What I really want to try is making them with another kind of cake mix and see how they turn out!  I will keep you all posted. :)

Go home.  Make these cookies.  And love your life.

Tuesday, March 10, 2015

Articles of Faith and DEVILED Eggs, of course!

So, for the last three weeks I've been doing all kinds of things to write about on the blog...but I've not had time to write!  So now I've got a surplus of subjects, and a shortage of time.  :/  Oh well!  That's life. :)

Last month I did this project for my calling at church as an Activity Days Leader (for girls 8-11).  I'd been looking for another way for them to practice their Articles of Faith.  We've played great games and stuff (like Article of Faith Spoons: a favorite of the girls'), but once in a while you just need to change it up!  So I found this pin for a free Article of Faith Flashcards printable!  They are so cute!  And the girls loved them so much that they are currently making their own. I made a few sets to use at an activity, but the girls really wanted to take them home.  So now they're making them, too!


So one side has a picture and some key words along with the AoF number, and the back side has the whole thing written out.


I just cut them out and pasted them onto black cardstock.  Then punched a hole and tied them together with a little piece of twine.

To the person who took the time and effort to make this adorable printable AND make it available for free, I say thank you soooooooo much!!!  This has been a great blessing to the girls in our program!  So thank you for sharing your talents with us!

Ok...so something else that I've been doing as lot of lately is....Deviled Eggs.

Back-story: I used to HATE them!  I thought they were of the Devil (see what I did there??? Ha!).  Seriously though, I thought they were disgusting!  In fact, I don't remember having ever liked them until about a year ago.  I was pregnant with my 3rd child.  In fact, I was VERY pregnant!  Probably about 8 months along. (Now, those of you who have been in my shoes may know that pregnancy can do some weird things to your taste buds...)  I went to a baptism at church.  It was after lunchtime, and somehow I had not had time to eat lunch before we went.  But they had food afterward.  I was quite hungry by this time, so I meandered over to the table, being careful not to be the first one up and grabbing food, but trying not to let too many people get ahead of me either.  They had some lunchmeat and salads and other such foods.  Then there we're these deviled eggs...I don't know what possessed me (teehee) to grab one, but I did.  I ate all my other food before I ate it, but once I did...oh my gosh!!!  I was in heaven!!!  Throwing all etiquette aside, I raced over to the table to see if there were any more.  I shamelessly took the last 2.  And then I came home and found a recipe and learned how to make them for myself.  Then I made them over and over again for a couple of weeks.  ;)

So here it is!  This is the recipe I use when I get on a deviled egg kick.  I have taken a few things from different recipes and put them together to make it work for me.

Deviled Eggs

6 eggs
1/4 cup mayonnaise
1 tsp white vinegar (or a little less depending on taste.  I usually use slightly less)
1 tsp spicy brown mustard (or whatever mustard you have on hand)
1/8 tsp salt
Freshly ground black pepper
Paprika (for sprinkling on top)

Of course, you can always double the recipe if you're making them for a crowd!

Here's the step-by-step:

Step 1: Place eggs in a single layer in a saucepan and cover with enough water that there's about 1-1 1/2 inches of water above the eggs.  Add a splash of vinegar to help keep the whites from making a huge mess if one of the shells crack.  (This really does help!  It happened to me!)


Step 2: Heat on the stove-top on high heat until the water begins to boil.  Then cover, and turn the heat to low.  Cook on low for 1 minute.


Step 3: Remove from heat, and let it sit covered for 14 minutes.


Step 4: While you're waiting for your eggs to cook, mix the mayonnaise, vinegar, mustard, salt, and pepper together in a mixing bowl, and set aside for later.


Step 5: When 14 minutes is up, take the eggs out of the pan and place them in a separate bowl.  Run cold water over them continuously for 1 min.


Step 6: Crack & peel the eggshells. (Always crack & peel from the big side of the egg first.  There is an air pocket on that side that makes it much easier!)


Step 7:  I usually rinse my peeled eggs to get the rest of the shell pieces off.  Then I pat them dry with a paper towel, and cut them in half lengthwise.


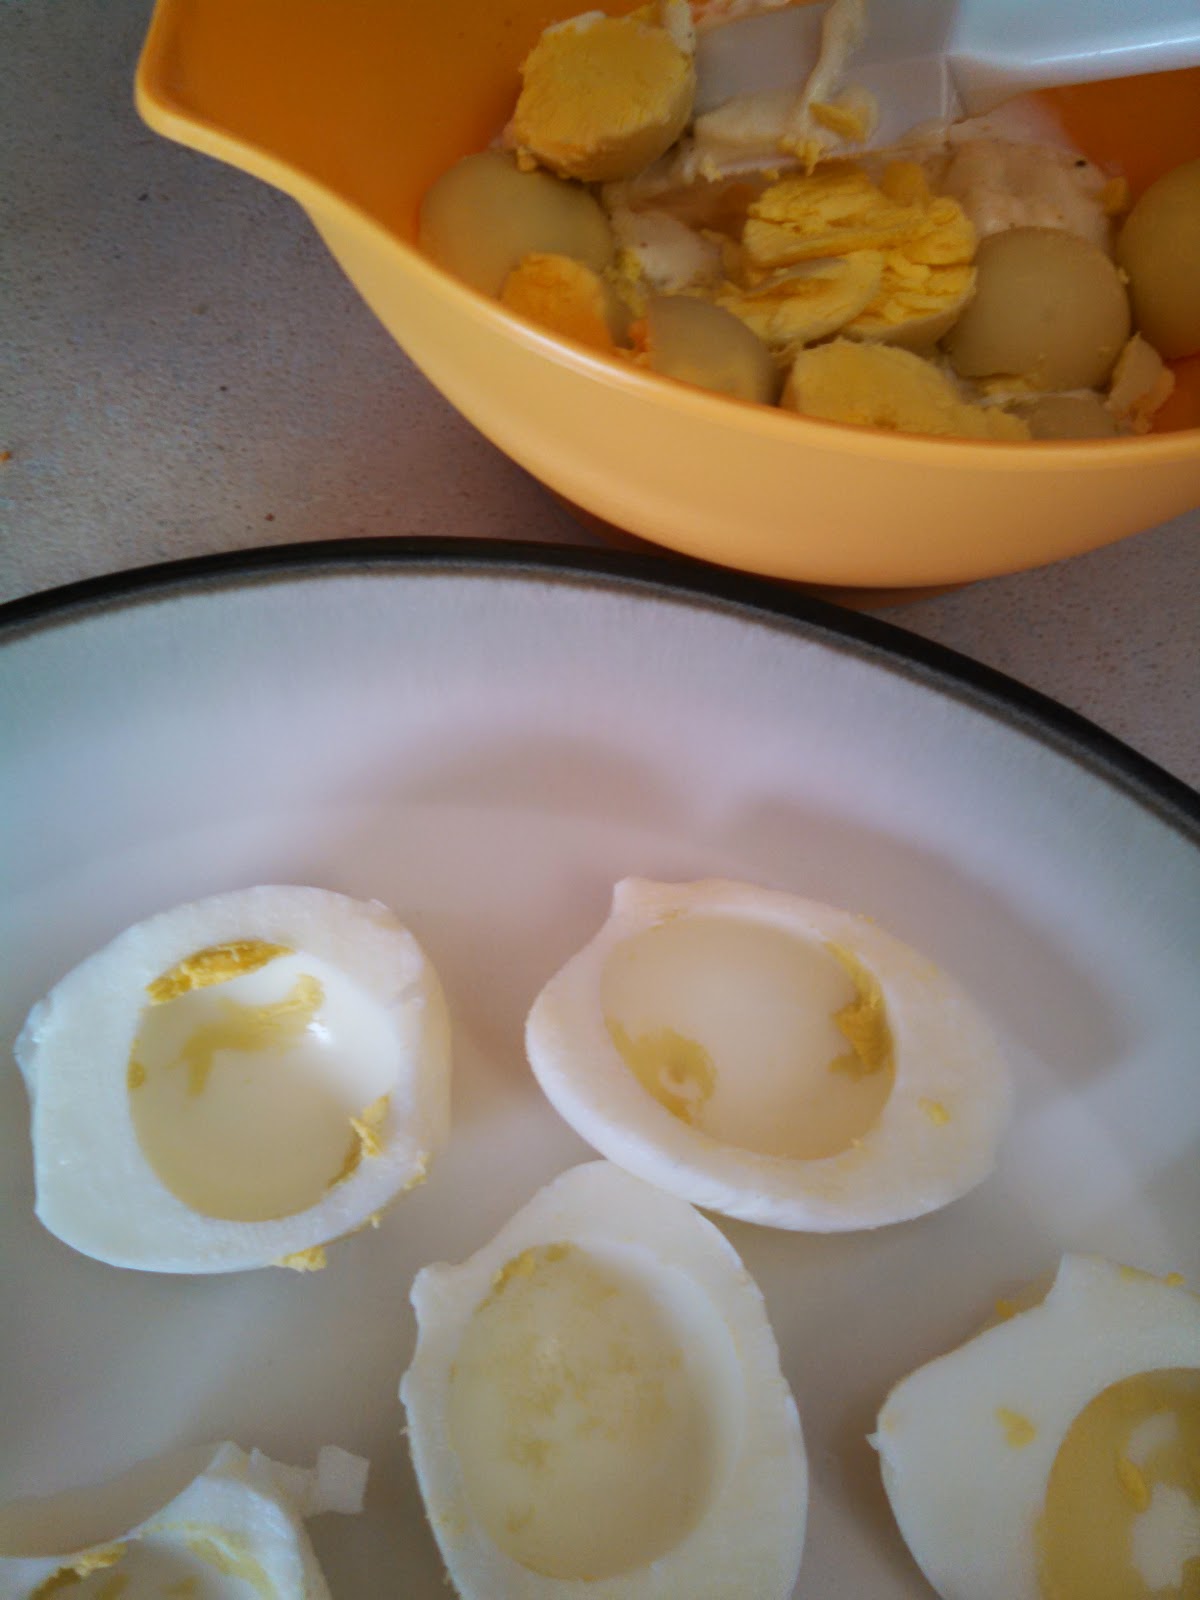
Step 8:  Pop the yolks out of the egg white and into your mixing bowl that has the mayonnaise and mustard mixture in it.  Place the empty egg whites on a serving platter.


Step 9: Mash the yolks into a fine crumble, and stir it all in with the other ingredients (it's ok if it's still a little lumpy).

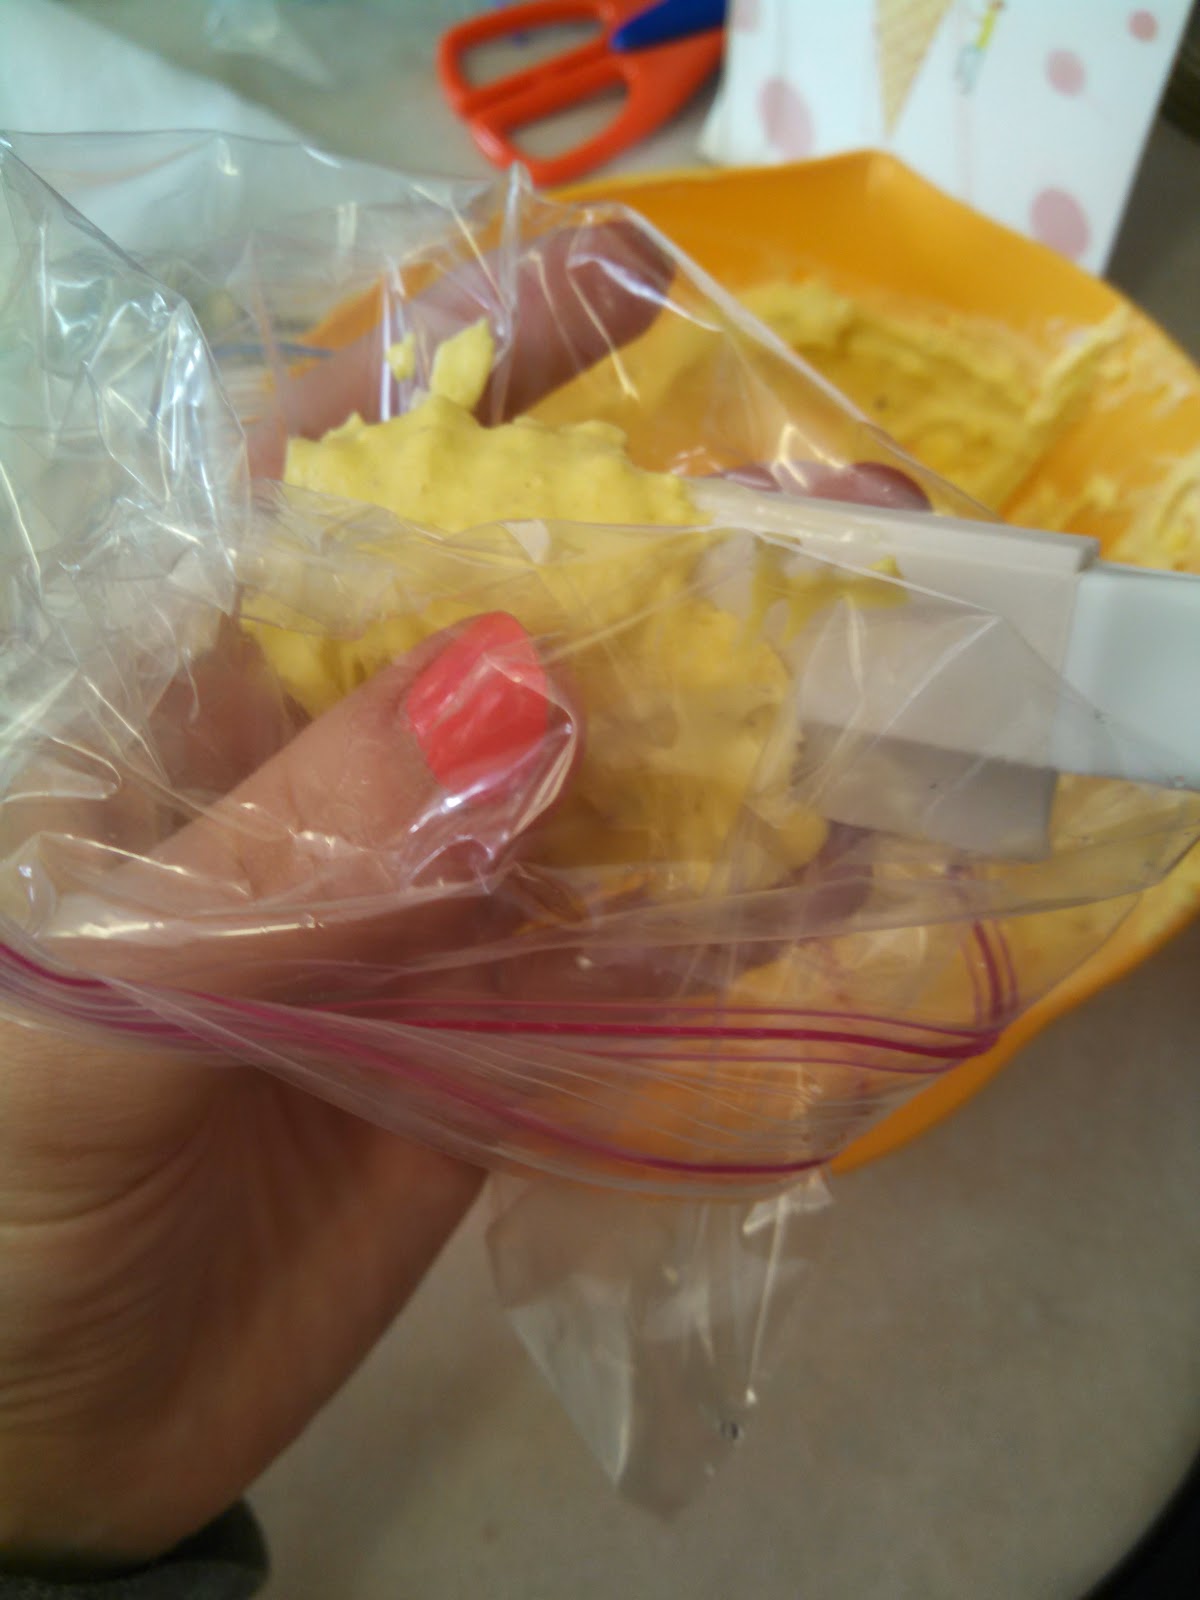
Step 10: Roll the top of a ziploc bag over your hand while your hand is acting like it's holding a cup, and scoop the mixture into it.  When it's full, twist the end closed and cut off one of the bottom corners of the baggie to make a hole.


Now you can use it like a piping bag and just squirt the yolk mixture into the egg whites.  This makes it much cleaner and easier to portion evenly, compared to spooning it into the egg whites.


Last, but not least: sprinkle with paprika!


Holy yum!!!!!  So delicious!  I know it looks like a lot of steps, but it's really easy once you've done it a couple of times.  The hardest thing for me was getting the eggs cooked just right.  (Since you never really know until you open one up.)  But this method has worked for me EVERY TIME.  That's why I'm sharing it with you!  But you may find you need to tweak it a little based on your stove, your altitude, or any number of circumstances that are different from mine.  But I got my timing through trial and error and a lot of internet searches! ;)  So I hope it helps someone out.

As Chara has mentioned a couple of times now, if you have any ideas of things you would like to see us try for you, let us know!  Leave a comment.  We would love to be your guinea pigs!

Friday, March 6, 2015

When I Was a Wee One...and a promised recipe

My wonderful mother reminded me today that I promised y'all a pancake recipe! Oh, but not just ANY pancake recipe! A delicious, to die for, unimaginagbly amazing, gluten free, masterpeice of a pancake recipe! Brought to you by a stunningly gorgeous blogger no less...wait... ;)

"Mom!" I said, "But I don't have a super spiritual thought or hilarious story to put on there with the recipe." But then I thought, maybe I could tell a story of when I was a little girl! (This is kind of a common phrase in our family because on the rare occasion my dad was actually home when it was bedtime as kids, we would always say "Daddy tell us a story of when you were a little boy!" And trust me they were always way more exciting than any nursury rhymes!) So I asked my mom, "What did I do that was funny when I was a little girl?" Crickets chirp...chirp...chirp....Then finally she responded, "Well you used to slam your bedroom door and scream 'I hate you!' at the top of your lungs when you got mad!" "No! Something funny!" "It was pretty funny!" Thanks Mom...lots of love right back to ya there...
Well here goes,
When I was little, (okay, littler!) I, like any other little girl, LOVED to dress up! Being the youngest of three girls in the family we had a good amount of dress up cotumes and accessories that Mom had made and we had accumulated over the years. Whether it was a pioneer, or a princess, normal clothes just couldn't compete with costumes. If I watched Pocahontas, five minutes afterward I would be outside running around in my Indian costume singing "Colors of the Wind"! Many a day I spent trying to be every princess I ever saw! Or I would go outside to rake up pine-needles in my pioneer dress and pretend I was raking hay in a barn. Because that's a blast, right?! What every little girl wants to be doing! I was kind of obsessed with pioneers when I was a kid. I also wanted to do everything my sisters could do! (Like the time I forged my own dance card so I could go to the youth dance with them.. It didn't work out for me too well...Turns out, those dance cards weren't the only thing that got you in!) So when my older sisters went on a pioneer trek with the youth, I wanted to go too! Since I couldn't, I forced my little brother to do a mini-trek with me at home. I actually forced him to do quite of few of these mini treks, so this was just one example. My dad put an old whiteboard kind of thingy on our garden wagon to look like a pioneer wagon and we (or rather, I) filled it full of "provisions" like clothes and blankets and food and then we put on pioneer clothes and dragged that wagon around the yard. I had planned on doing it all day long but James liked the idea of going inside to play video games about five minutes into the venture. I remember being so into it! I was remembering the pioneers as I trekked around the yard thinking of how hard it was. In my defense, most of the time I was pulling James in the "handcart", so for a little girl, it was pretty hard! Oh those mini-treks! Good times! James and I were always little playmates but we didn't always get along like peanut butter and jelly...I often wanted to do things and make things that he never wanted to do but I would yell at him and try and convince him for hours before Mom would make him do it just to calm me down! I thought I was very persuasive! These are only a few of my little adventures, but the funny thing is that if you ask anyone in my family about any of these things, I'm sure 50 other silly things I did as a kid will come to their mind for them to tell you all about! I've started off with some of the least embarressing ones. We'll save the others for another day...maybe...

Looking through old pictures led me to this treasure! Looks like my pioneer stage started earlier than I thought!
 

Or maybe Lauren started me on it... What a great big sister!

I love to look back and see how I've grown and changed over the years. I'm so grateful for those carefree childhood years because I will always cherish those memories. Is it any wonder that Christ loves the little ones? As I get to see my little neice and nephews now, I love to remember what I was like at that time and I get so excited to be able to raise my own little crazy bits of heaven someday!

Now to that recipe I promised!
We got this recipe from a wonderful lady in the ward named Jonell Francis! She gave us this amazing cookbook that she has created called "Feel Good Foods". It has been sooo helpful during our adventure through "gluten-free conversion". The recipe is copyrighted and I am posting it with her permission. (Thank you Sister Francis!) She is truly an amazing woman with a ton of knowledge about nutrition and overall health. What a role model! I highly reccommend you check out her website at www.myfeelgoodfoods.com. Thank goodness for awesome people!

I couldn't resist long enough to take a picture!
Gluten-free Buttermilk Pancakes

1 egg
1 cup Awesome Gluten free Flour (which is another one of her recipes for homemade gluten free flour, or I'm sure any gluten-free flour you have will work fine)
1 Tablespoon each: honey, canola oil, and baking powder
3/4 cup dairy free milk
1/2 Tablespoon apple cider vinegar

Mix ingredients in blender (or briskly with a whisk). Cook on a hot buttered griddle.

Makes about 7 or 8 pancakes. We always have to double it!

Once again, if you have any questions or have anything to say about our blog, post it in the coments. We'd love to hear ideas and feedback!

Have a PAN-TASTIC weekend and eat lots of fan-cakes...